 |
| http://laughingsquid.com/street-stencil-art-by-roadsworth/ |
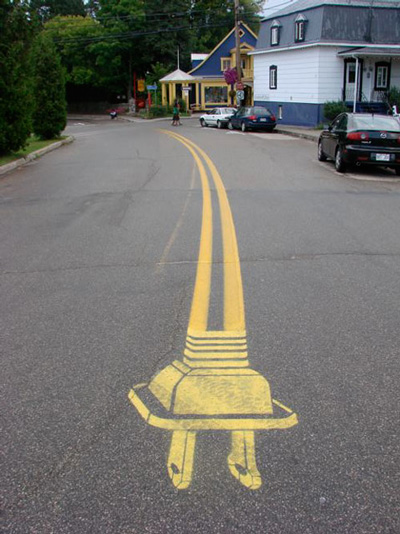
I started with this image just to remind you how gnarly stencils are!
This week I did some research on packaging to get some inspiration and ideas for my box. Some of the images I found that stuck out to me are below....
 |
| http://4entrepreneur.net/?p=1191 |
This one has an effect similar that I was trying to achieve. I wanted a mold for the stencil to sit in. I thought about doing a box in the shape of the stencil but remembered my goal of wanting the box to be multi-functional even after you are finished with the stencil. So I scrapped that idea but did keep it in mind for the mold.
 |
| http://idiwa.net/assets/html/packaging.html |
I liked the graphic nature of this box. I thought about keeping a simple color scheme like this one but then I figured with all the visual stimulation at a craft store this might look boring and not catch people's eyes. I appreciated its simplicity but I decided to go in another direction.
 |
| http://www.drexel.edu/westphal/portfolio/?pID=vscm&id=749 |
This box was close to what I was trying to achieve. Colorful and interesting. I knew I wanted to make a box but I was unsure how I wanted to "dress it up." I eventualy came up with the idea of making it look crafted and home made since that's the type of work stencils produce. So I thought.... what would my grandma make? It had to be something bold with a touch of retro....
My first study model was a bit of a disaster LOL. I decided to try and use foam board because I wanted the box to be sturdy and light weight. I quickly discovered the flaws of using that material. 1) Its incredibly difficult to cut, 2) Even when you cut it, the foam on the inside maybe be cut at an angle!--> you will notice this when you see the angled edges of my box below
 |
Front view
|
 |
| Side view of angled edge |
From this model I figured I wanted to make a box that was 9x5 inches originally with a depth of 1/2 inch. The depth I had to change to accommodate the handle I was putting on the stencil but the overall size of the box was just what I needed. I proceeded to make more study models on smaller scales to experiment with the type of lid and way to display the stencil.
The first option was exploring the closing device of the box. I tried to see if a sliding lid would be more appealing than just a regular flip open-flip close lid.
 |
| Axon view |
 |
| View from above of sliding lid |
 |
| Head on view of lid |
I didn't like this idea because it didn't look as clean lined as I wanted it to and, if the lid came out of the insert, it would be a frustrating process for the consumer to put it back.
My next idea was a plastic box to really display the stencil. I used a small box I already had and made a smaller version of the stencil and started to explore the handle I was trying to incorporate and whether to have the stencil sunk into a mold or on top of one. I also was thinking about mimicking a nickel/tin container by using the metal paper
 |
| Side view |
 |
| View from above |
 |
| Stencil handle |
A few things I learned about this model. I decided I didn't want to work with plastic or the foil paper because they didn't have the handmade quality I was aiming for. I also decided not to do the elevated mold because it didn't protect the edges of the stencil.
The last study model I made explored having a see through lid and a different handle.
 |
| Front view |
 |
| Side view |
 |
| Close up of handle |
 |
| View highlighting lid closure |
I liked this box but I foresaw some problems if I did it to the scale of my box. In order to see the entire stencil through the plastic I would have to make my box bigger. I wanted to avoid that as to not make my stencil look dwarfed and insignificant inside the box. So I steered away from that idea and went with my original simple concept.
 |
| Top view |
 |
| Top view again |
I wanted colors that would be attention grabbing without being too harsh. I used my original graphic from my ad campaign and mimicked those colors on the box (minus the black). The inside repeats the color scheme and the bird image
 |
| Inside of box with mold and stencil |
The box contains the stencil (positive) and mold (negative). I added the wedges on the side to elevate the mold making it easier to take it out as needed.
 |
| Inside of box minus the stencil |
I repeated the bird image on the bottom so that even when you have discarded the stencil and are using it as a storage box, you will always remember the original item it held.
 |
| Stencil with handle (Positive) |
The stencil with its wooden handle. I added this to make it easier to use when tracing and when pulling it from the mold.
 |
| Stencil Mold (Negative) |
Here's the mold that can be used as a stencil if for any reason the positive stencil is lost or damaged.
 |
| Inside view without stencil and mold |
This is what the box looks like minus all stencils. I really wanted the box to be fun and having a handmade quality to it. Hope I achieved it! Based on my peer reviews people gave it and average of 4 out of 5. Most people suggested putting the image of the stencil on the front to see know immediately whats in the box. I think thats a great suggestion that I wish I had thought of before my final product.
I learned a lot from doing this project. Again, it was a lesson in time management. I felt I didn't give myself enough time to really explore all of my options. I think I also was being too practical vs. imaginative. I was thinking about my consumer, the cost, etc and didn't want to do to much because it wouldn't be economical for the consumer. For the next project my goal is to really step outside of myself.
I would buy it if I saw it in the store, not for the stencil but just because I like the box!


 1:44 PM
 Design or DYE


1 comments:
The development of your model is wonderful. It is clear you really thought through every element of your model- which is wonderful. Your process through the clasps and material of the box is great, you solved problems, as any good designer should.Your final product is multi function, which is great. I could take the stencil out, throw it in my arts and crafts box and use the package on my desk or dresser, or keep the stencil in the packaging. I would definately buy this product. I think you did a great job marketing towards the correct market, whether it be an art student, an artist or someone who loves to scrapbook: it draws attention.
Post a Comment